Bacon Pancakes

Posted on

Okay, well if your not intrigued by the name, you should prepare yourself for an overload of flavor! I found this recipe simply surfing the web last night. The orignal site that I found the website on actually copied it from and 1962 aunt jemina box, so I figured there was no harm in stealing it as well. To say that I am going to give you a recipe is actually untrue. More of guidelines. So here goes, the basic instructions

Bacon Pancakes

  • Bacon
  • Pancake Batter
  • Syrup, butter any other topping you enjoy on your pancakes


  1. So the basic guidelines are this. Cook your bacon. It needs to be as flat as possible, and as crispy as you can get it. Crispy bacon works best, it holds up much better, and makes the pancake so its not chewy. No one wants a chewy pancake
  2. Remove the bacon from the pan/griddle and drain on a paper towel. Dab as much of the grease as possible with a napkin. Also Clean off as much of the grease as you can off of the griddle. But make sure to leave some in order to cook your pancakes.
  3. the next part of their recipe was to place the bacon on the griddle and pour pancake batter over it. like so….
  4. My suggestion, or really what I’ll try next time, is to pour a thin layer of batter down first, then put the bacon down, and pour the same amount on top. Otherwise, you get this

Anyways, you  see mine are not so pretty but they were simply amazing! You should try this, especially if you need a different variation on breakfast food. Simply Wonderful!

Until next time, stay hungry my friends!

–your blogstress, SMCombs


Easy Chocolate Eclair Squares

Posted on

This is a recipe I have been looking to try and never found the time to. I decided to bust it out on memorial day as a quick, easy dessert that was sweet but not so heavy on the stomach. To say the least, it was a crowd pleaser! I got this recipe from a nabisco cookbook called “Holiday Appetizers & More” and, its extremely easy. Make sure to make it in advance, it does need 4 hours refrigeration time.

Easy Chocolate Eclair Squares

  • 2 cups cold milk, divided
  • 1 pkg ( 4 serving size) Vanilla Flavor instant pudding & pie filling
  • 1 tub (8oz.) whipped topping, thawed
  • 22 graham crackers
  • 4 squares bakers unsweetened baking chocolate
  • 1/4 cup (1/2 stick) butter or maragarine
  • 1 1/2 cups powdered sugar
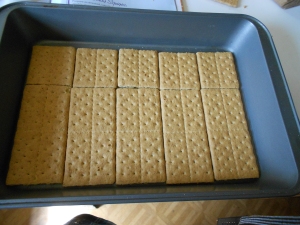
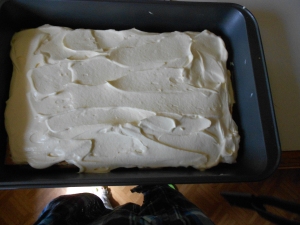
  1. Pour 1 3/4 cups of the milk into a large bowl. Add dry pudding mix. Beat with a wire whisk for 2 mins. Gently stir in whipped topping. Layer 1/3 of the grahams and half of the whipped topping mixture in a 13×9 -inch pan, breaking the grahams as necessary to fit. Repeat layers. top with remaining grahams.
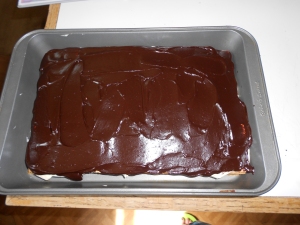
  2. Microwave chocolate and butter in medium microwaveable bowl on HIGH 1 1/2 min., stirring after 1 minute. Stir until chocolate is completely melted. Add sugar and remaining 1/4 cup of milk; stir until well blended. Immediatly spread over grahams.
  3. Refrigerate at least 4 hours or overnight. Store any leftovers in refrigerator.

its amazingly delicious! I hope you can find the time to try it, you will not regret it!

Until next time, Stay Hungry my friends!

— your blogstress, SMCOMBS

Bacon Ranch Juicy Lucys

Posted on

Well, being memorial day, the obvious choice for dinner was something grilled. One small problem, our grill is out of commission at the moment. So I settled for the old fall back, burgers and fries. With it being a holiday, I stepped it up a notch and made Juicy Lucys. Juicy Lucys first came to be in my recipe database after watching and episode of “Man vs. Food”. After seeing these delectible little burgers, I set about expirement with my own juicy lucy. I played around, and this is actually my very recipe! Its a bit sketchy, but anyone who has ever made their own recipe knows that a good recipe is never finished, your always trying to better yourself. Enjoy!

Bacon Ranch Juicy Lucys

  • 1 lb. Hamburger meat
  • 1 package (1.0 oz, 28g) Ranch dressing seasoning
  • 1/2 tbsp garlic powder
  • 6 strips, fully cooked  bacon
  • 1 1/2 slices of cheese

(this recipe makes three juicy lucys, you can change it accordingly)

  1. Mix together the pound of hamburger meat, package of ranch dressing seasoning, 1/2 tbsp garlic powder. (The seasoning may make the meat look brown is some spots, its okay, I promise)
  2. Take the hamburger meat and split it up into 6 equal sized balls. (approx. 1/3 cup each)
  3. Pat each ball out into hamburger patties.

          4. Take one half a slice of cheese, (I use velvetta cheese slices, they make it  that much better!) and place it in the middle of one of the patties, take another patty, and place it on top of the cheese, then smash the sides together to create a cheese pocket between the two patties.


         5. Cook those juicy patties until they are done all the way through. (Side note : If the cheese starts to ooze, don’t worry, it just means the burgers werent sealed together all the way, when you flip it, the cheese should cook and seal the whole. Some seepage is to be expected though.


       6.) After they are all done, top them with bacon and whatever delightful sides you want, and enjoy! Be careful though, the cheese will be hot and may shoot in your mouth!

Until next time, Stay Hungry My Friends!

— Your blogstress, SMCombs


Happy Memorial Day, 2011!!!!

Posted on


Mine went by without much excitement. (unless you can call cleaning house and yardwork exciting in the least bit!) I was able to cook 2 dishes, which I’ll post the recipes to momentarily! While, I was able to shot some patriotic shots of the local VFW (see that pretty picture?!?!?) I do want to repost my facebook status on my blog for all whom are not facebook friends with me.

I’m a proud daughter, granddaughter, niece and friend of many veterans. Today, I salute all of you, past and present! Happy memorial day! Keep it safe and have a blast!


Texas Tornado Cake

Posted on

Well! What an exciting scary day in my neck of the woods! In honor of the talk of the town, the tornado touching down just outside of jacksonport, today I’m posting a recipe I found sometime ago on the internet for a very easy, yet delcious cake called Texas Tornado Cake. So, while I recover from the shock of the day, here’s the recipe and a pic of our tornado!


TEXAS TORNADO CAKE

1 1/2 cup white sugar
2 eggs
2 c. fruit cocktail with juice, mixed in blender
2 tsp. baking soda
2 c. plain flour
1/2 tsp. cinnamon
1/4 tsp. nutmeg
1/4 c. brown sugar
1 c. chopped nuts

Mix and cream together sugar, eggs, fruit cocktail, baking soda, flour and spices. Pour into greased 13″ pan. Mix nuts and brown sugar together and sprinkle on top of cake batter. Bake at 325 degrees for 40 minutes.

SAUCE FOR CAKE:

1 stick butter
1/2 c. evaporated milk
1 c. brown sugar
1 c. coconut

Mix in saucepan. Bring to boil. Pour over cake while still hot.

Till next time, Stay Hungry my friends!

— Your Blogstress, SMCombs

Chicken Pot Pie

Posted on

So, thus far, I’ve only posted desserts. I must say, they are my favorite to make, because dessert is always everybodys favorite part of the meal, but my talents to range to actual meals as well. (Surprised? Don’t be!) Now, I know Chicken Pot Pie is usually a winter month meal, but with the nasty weather we have been getting, coming in out of the rain to a warm, homemade chicken pot pie is really nice. This recipe is actually my own, I took several elements from different recipes, tweaked them a bit, and now have the perfect recipe! This particular recipe makes either 2 9-inch pies, (You can cook one, and freeze the other!) or 1  13×9 inch casserole. Either way, it really is fantastic, and hey, who doesn’t like chicken pot pie?!??

Chicken Pot Pie

  • 1 cup Chopped onions
  • 1 cup chopped celery
  • 1 1/2 cups diced potatoes
  • 1 can green beans
  • 1 can corn
  • 1 can peas
  • 1 cup chopped carrots
  • 1/2 cup margarine or butter
  • 2 cups chicken broth
  • 1 cup half and half
  • 4 cup chopped, cooked chicken
  • 2 (15 oz) packages of pie crust
  • salt
  • pepper
  • 1/2 cup all-purpose flour
  1. Saute’ potatoes in butter/margarine for 5 minutes. Add onion, celery, and vegetables. Saute’ another 10 minutes. Gradually add flour to mixture. Stir constantly for 1 minute.
  2. Combine half and half with the chicken broth. Gradually stir into veggie mixture. Cook over medium heat, stirring constantly until thick and bubbly. Add salt and pepper to taste. Add chicken.
  3. Preheat the oven to 400 degrees.
  4. Spray non-stick spray into either two 9 inch pie pans or a 9×13 inch casserole. Place pie crust on the bottom of pan, covering the entire bottom of can. (may need to cut to fit.) Pour the mixture over the crust, then top with remaining pie crust. Cut Vents in the top of the crust.
  5. Bake for 40 minutes. (Or until golden brown!)

Until next time folks, Stay Hungry!

— Your Blogstress, SMCombs

  •  

Peanut Butter Pie

Posted on

Every now and then, you come across a recipe that quickly becomes a highly requested favorite. My recipe today is one I found some time ago, and I honestly don’t remember where I got it. Although the origins are a bit shady, I still get MANY request for this recipe. The great thing about it is that it is actually a NO-BAKE recipe, and it really doesn’t take long to throw together. (Unlike the first one I threw at you… it’ll be okay, I promise!) So, I hope you enjoy this delicious treat as much as my family and friends do!

Peanut Butter Pie

For the pie:

  • 1 prepared chocolate cookie pie crust
  • 1 cup creamy peanut butter
  • 1/2 cup sugar
  • 8 oz. cream chees (at room temperature)
  • 4 1/2 cups (12 oz. ) of non-dairy whipped cream (divided)
  • 1 jar hot fudge topping ( divided)

Drizzle:

  • 2 tbsp hot fudge topping
  • 2 tbsp creamy peanut butter
  1. Combine peanut butter, cream cheese and sugar. Gently fold in 3 cups of the whipped topping. Spoon mixture into the shell. Using a Spatula, smooth the micture to the edges of the pie crust. Reserve 2 tbsps of the hot fudge topping. Microwave the rest for 1 minute, stir. (The jar may be hot, use extreme caution when pulling out of the microwave)
  2. Spread the hot fudge  topping over the pie to cover the peanut butter layer. Refrigerate until serving time. Just before serving, spread the remaining whipped topping (approx. 1 1/2 cups) over the hot fudge layer (don’t mix the two layers!)
  3. Drizzle the hot fudge and peanut butter over the top, serve.

A few side notes to make give you an edge when making this. If you place the 2 tbsp of peanut butter in one small ziploc bag, and the same with the 2 tbsp of hot fudge topping, kneed them for a little while, then cut a small bit off of a corner, you can use the bags like cake decorating bags, and get a pretty design on the top of the pie. If you want the pretty look in the picture, do zig zag lines horizontally with the peanut butter, and do zig zag lines vertically with the the hot fudge and simply drag a clean butter knife through the two.

There you have it! A much easier, yet equally delicious, recipe!

Stay hungry!

— Your blogstress, SMCombs


Cinnamon Sugar Pull-Apart Bread

Posted on

My first official recipe is the one I tried tonight, Cinnamon Sugar Pull-Apart Bread is something I literally stumbled upon on the web on evening. (No, seriously, I was playing on stumbleupon.com, I get alot of my recipe ideas from there, randomly generated information does wonders for boredom!) It comes from http://www.joythebaker.com/blog/2011/03/cinnamon-sugar-pull-apart-bread/, and if the name doesn’t already have your drooling, the picture will!

The recipe is a really long, and time consuming one, considering you have to mix things, let them rise, prepare, wait, and then actually bake it, all in all, you are looking at somewhere around a 2 1/2 to 3 hours in totally for the finished product, but let me tell you, it is just as amazing to eat as it is to look at! I hope you enjoy trying this recipe as much as I did!

Cinnamon Sugar Pull-Apart Bread

(Makes one 9x5x3-inch loaf)

For the dough:

  • 2 3/4 cups plus 2 tbsp all-purpose flour
  • 1/4 cup granulated sugar
  • 2 1/4 tsp active dry yeast
  • 1/2 tsp salt
  • 2 ounces (4 tbsp) unsalted butter
  • 1/3 cup whole milk
  • 1/4 cup water
  • 2 large eggs, at room temperature
  • 1 tsp  vanilla extract

For the filling:

  • 1 cup granulated sugar
  • 2 tsp ground cinnamon
  • 1/2 tsp nutmeg
  • 2 ounces (4 tbsp) unsalted butter, melted until brown


  1. In a large mixing bowl, whisk together 2 cups flour, sugar, yeast, and salt. Set aside
  2. Whisk together eggs in a seperate bowl, set aside.
  3. In a small saucepan, melt togeter milk & butter. Remove from the heat, add water and vanilla extract. Let mixture stand for a minute or two.
  4. Pour the milk mixture into the dry ingredients and mix with a spatula. Add the eggs until the eggs are incorparated in the dough. (on the orignal site I got this from she had some really good words of advice, the eggs will be soupy, and it will seem like the dough and the eggs will never mix I gotta say, I had my doubts, but she was right, the eventually did mix!) Add the remaining 3/4 cup of flour and stir with spatula for about 2 minutes. The mixture will be sticky!
  5. Place the dough in a large, greased bowl. Cover with plastic wrap and a clean kitchen towel. Place in a warm space and allow to rest until  doubled in size. (Approx. 1 hour)
  6. While the dough rises, whisk together sugar, cinnamon, and nutmeg. Set aside . Melt 2 ounces of butter until browned. Set aside. Grease and four pan. Set aside.
  7. Delate the risen dough, and knead about 2 tbsp of flour. Cover with a clean kitchen towl and let rest for 5 minutes. On a lightly floured surface, using a rolling pin, roll dough ou to approx. 12-inches by 20-inches. Brush the melted butter across all of dough and sprinkle with the sugar/cinnamon mixture. (MAKE SURE THE SURFACE IS FLOURED! My strips you are about to cut it into stuck to the counter, I was able to salvage it, but it could have been disaterous!!!!)
  8. Slice the dough into 6 equally sliced strips, stack the strips and slice the strips into 6 equal squares. Stackik the squares in the pan like a flip book. Place a kitchen towel over the pan, and set it in a warm place for 30-45 minutes, until it has doubled in size.
  9. Cook on 350 degrees for approx. 30-35 minutes or until the top is very golden brown. (I ended up baking my bread for closer to 45 minutes, in an attempt to get the middle done. Really, you just need to pay close attention to it, and DON’T BURN IT!!!!)
  10. Allow it to sit, you don’t wanna burn yourself!

Its amazing warm, and I have it in a ziploc bag in the fridge, every intention of enjoying it in the morning for breakfast!

Stay Hungry!

–your blogstress, SMCOMBS


Cooking With Combs

Posted on

So, I’m pretty late in the blogging game, but let me give you a basic background as to why I am here. I LOVEEEEE to cook. I am never as happy anywhere as I am in my kitchen. Give me a new recipe, and I see it as a challenge. My intentions with this blog are take you along on my journey through the world of food. Recipes can come from anywhere (and yes, I’ll give credit to everywhere I get the recipes from! ) and any recipes you wanna throw at me, I promise I’ll try! So I hope you enjoy my trimuphs (and disasters!) and maybe, just maybe, my joy in life, will bring alittle joy to yours!

— your blogstress, SMCombs